
Google Forms + QR = Pretty Sweet


Only one short month until school is in session! We are wicked pumped up about that. This post shows you a quick and easy way to gather information from your new students using Google Forms.


Create a Form
Open Google Drive.
1. Click New.
2. Hover on More.
3. Click Google Forms.


1. Add a title. Below the title it is recommended that you add some directions or a guiding statement about the survey.
2. Click and you can change the question type. I picked Short answer for the last name question. I generally start with asking the survey taker their last name. I find it is easier to sort responses later on.

1. Click the + symbol to the right to add a new question.
2. Toggle Required if you need the kids to answer that question. I always make the name fields required to make sure that information is always collected. The survey taker can't submit until they have answered all required questions.

1. Right under the checkbox/rectangle are three little dots. Click those little dots. I sometimes call it an ice cream cone. (Why? Who would ever have an ice cream cone with one or two scoops? Three is more like it.)
2. Click Description.
3. Add some text that would help the survey taker.
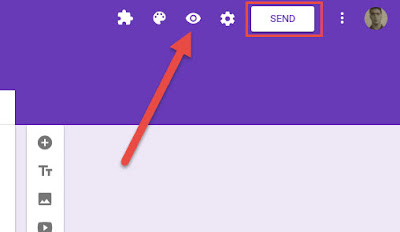

Click the eyeball at the top of the screen to see what the survey looks like.
Click Send when you are ready to share with your class.


This appears when you click Send.
1. Click the link icon.
2. Click COPY.


Create a QR Code and Tiny URL


Navigate to goo.gl
1. Paste the code.
2. Click Shorten URL.
3. Click details.

1. Students can use this short URL to access the survey directly.
2. Copy and paste this QR code to a document you print or just display this screen on the board. The students can scan the code or type in the shortened address.


Comments

Post a Comment

Popular posts from this blog

Who is emailing me? The Blue Man Group??? (Add an image to your Google account.)

WHY It is always nice to put a face with a name. Sometimes we need a tiny little reminder of what someone looks like because we don't see them very often. Follow these steps to add/change the image associated with your Google account. HOW Open your email. Click your image. It might just be a blue circle if you have not added something already. Click Change . Find an image you like. Your amazing new image will appear. From now on everyone can put a name to a face!

Annotate PDF? How might I do that?

So I have a PDF and I need to edit it. Here is one method that works pretty well for me. Open Word. Click File .  1. Click Open . 2. Click Browse . 3. Find the PDF you want to annotate. 4. Click Open . Click OK when you see this box. Bam! Your PDF now opens in Word. Note: you maybe have to click Enable Editing at the top of the screen. Finished editing and want to turn it back into a PDF? Click File . 1. Click Save As . 2. Click This PC . 3. Pick a location. I usually save things to my desktop. 4. Click Save as type - and choose PDF. 5. Click Save .

Zoom - How to connect to a Zoom meeting.

This post was created to help anyone who is attempting to connect to a Zoom meeting understand how the process works. Click here for a video tutorial on how to get started with Zoom Continue reading for details on how to connect on an iPad/iOS device, Android phone/tablet, Chromebook and a laptop. While this won't solve every issue, it should take care of getting you quickly connected. The post will be longer than normal, just scroll down to the device you are wanting to connect. Most of these steps only need to be done the first time. Joining the second meeting will be much easier, pretty much just click and join. Please note - I made this post super fast. There are bound to be small errors. iPad/iOS We are using an iPad for this demo. I imagine connecting an iPhone will be nearly the same. Start by downloading the Zoom app from the app store. This is the very first thing you need to do if you don't have the app first the process may be more confusing. You...