I didn't think I would like Pokemon Go until I started playing it. One of the most amazing parts of the app hit me while walking in downtown St. Louis with the family. Most of the PokeStops are historical landmarks. Did you know there is someone famous buried under a parking garage? What about the Republican convention that happened in St. Louis over 100 years ago? These are just a few of ther things I might never have uncovered if I wasn't playing Pokemon. The discovery process was so fun that we couldn't wait to find the next thing. What if you could create a buzz like that in your classroom or building?
A week ago Dr. Parker tweeted me.
This tweet referenced a post by Dr. Brad Gustafson about creating a super engaging school tour in the style of Pokemon Go. He used Aurasma to create a series of posters that come alive in a way that kinda reminds me of the pictures in the Harry Potter movies. His idea was to engage new students when they come to the school for a tour. Who wouldn't want to seek out a series of eggs and hatch them? So fun!
We decided to try this out. I am so very thankful for Dr. Brad Gustafson for helping us out. I ran into some trouble and he walked me right through it. The power of the twitter community never ceases to amaze me.
This post is the process we followed to get our interactive school tour up and running. Our next step is to do this in a classroom in some way.
Just follow these three steps:
1. Setting up Aurasma
2. Creating some target images/posters
3. Using Aurasma
Just follow these three steps:
1. Setting up Aurasma
2. Creating some target images/posters
3. Using Aurasma
Setting Up Aurasma
Visit Aurasma.
Click Sign Up in the upper right corner.
Be mindful of the username you pick. That is what people will search for and follow after they download the app.
Example: Long School - we used the morning announcement Google account for the username. This helps Long keep consistent branding on the web.
Creating Images/Posters
This is a sample we used for Sappington Elementary. We had trouble with some of the images/posters at first but once we added the boarder everything started to work. This poster is an example of something that might hang somewhere outside the gym.
The image of the two PE teachers appears to be floating in midair once you scan the poster with the app. Pretty fantastic!
To start the process you will need to create some type of poster similar to what is above. We used Microsoft Publisher but pretty much anything will work. You could even use paper and markers. The final step is to convert your poster into an image. Save As or the camera on your mobile device works well to covert it into a jpeg.
Using Aurasma
Log into your Aurasma account to begin the creation process.
Click + Create New Aura in the upper right corner.
1. Add the image of you poster.
2. Click Next.

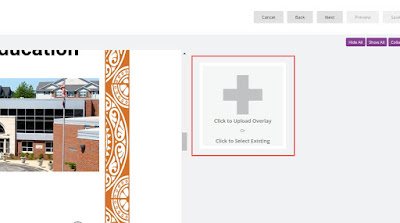
Click to Upload Overlay.
The overlay is the image that will suddenly appear to float over your poster.
For this example we used the pictures of the PE teachers.

Click Save.

Click Share. This allows what you created to be visible to the public.

Click to Upload Overlay.
The overlay is the image that will suddenly appear to float over your poster.
For this example we used the pictures of the PE teachers.

Click Save.

Click Share. This allows what you created to be visible to the public.


Let me know when Aurasma works with Android. It would not show the picture when I used it.
ReplyDelete