
This post was used as a teaching tool in some of the English PBL classes.
This post will introduce you to a few ideas to help with the video project.
In class, we watched this video twice. The first time we focused on a few questions based upon the work completed in class. For the second viewing, we broke into small focus groups. Each group watched for just one thing. The goal was to pick out something specific they could reproduce in their own videos.
Focus Groups
- Audience - Who are you creating this video for and what do you think they need to really know?
- Plan - Sketch out your shoot. This is the most important step that will save you time and effort. Using some type of storyboard will save you and make your whole production efficient.
- Sound - Whatever your subject is, it should be heard loud and clear. If there is too much distracting background noise, or the subject is super quiet, the whole video goes downhill.
- Lighting - If you are in your basement, the overhead lighting tends to be too harsh. Can you dim those lights a bit and introduce some lighting from the side?
- Background - What is behind the subject? A blank wall isn't too amazing but what if it was a bookshelf? Move the subject around until the background is interesting.
Video Breakdown
Audience

Two possible groups, budget orientated people and those who are in disbelief you could survive for five days on just $50.
Plan


After each day she showed how much money was left. This was a very good way to plan where she was and where she was headed next.
Sound

While she talks about $1 pizza you can't hear anything but her voice. If Lucie attempted to talk over the street noise I'm pretty sure she would be drowned out. Think as you shoot, can the audience hear me and is this a good shot for a voiceover?
Lighting

Having more than one light makes that shot much better. You can see there are some overhead lights, there is also evidence of a light source from the right. If you have to shoot in the basement, make sure you are using more than one light source.
Background

As Lucie walks down the aisle with her list, the cart is slightly out of focus in the background. This makes the whole shot much more interesting than just showing the list alone. Think when you are shooting something, is the background adding something interesting to the shot?

Same idea as she checks her list. The cart adds a lot to the shot, it makes it interesting and not dull.
Editing

For Friday there is a series of B roll shots while she talks. It starts by showing a short clip of a coffee shop while people walk by.


It ends with Lucie talking about her coffee.
All of these are evidence of her editing skills. It could have been a 30 second shot of Luice talking in her apartment but instead, she used a series of coffee-related shots to give the viewer something to look at.
How To Edit
Pay super close attention to your storyboard, it will save you time and effort. If you use it to capture solid raw footage, your editing should not take too long. Trust me, if your shots are not well planned you will spend tons of time editing your clips.
The screenshots below are from an app called FilmoraGo. We choose this app due to the price, free, and it works on most mobile devices.
You can also refer to this post we used in FACS for creating Tasty videos.
Music
There is a very good chance that your video will be removed from YouTube if you use copyrighted music. There are plenty of options when it comes to adding music. Check out these seven sites listed on the Creative Commons website.
I would venture to say your video might not fall the Fair Use category. Fair Use is a set of guidelines created to help interpret the law and not actually a law.
Android
WARNING!
- We would advise you to have a minimum of 1.5 gigs of free storage on your device before you start creating your project. Trust us, we learned the hard way. Use Google Photos to back all your images and videos to free up device space. It is also the easiest way to back up all your FACS videos.
- Do not delete any files off your device until the project has been uploaded YouTube and submitted for a final grade.
WARNING!

Start by clicking the huge plus symbol.

1. Click to access photos or videos.
2. I clicked Video and then Videos.

Select the first video you want to add to your project.
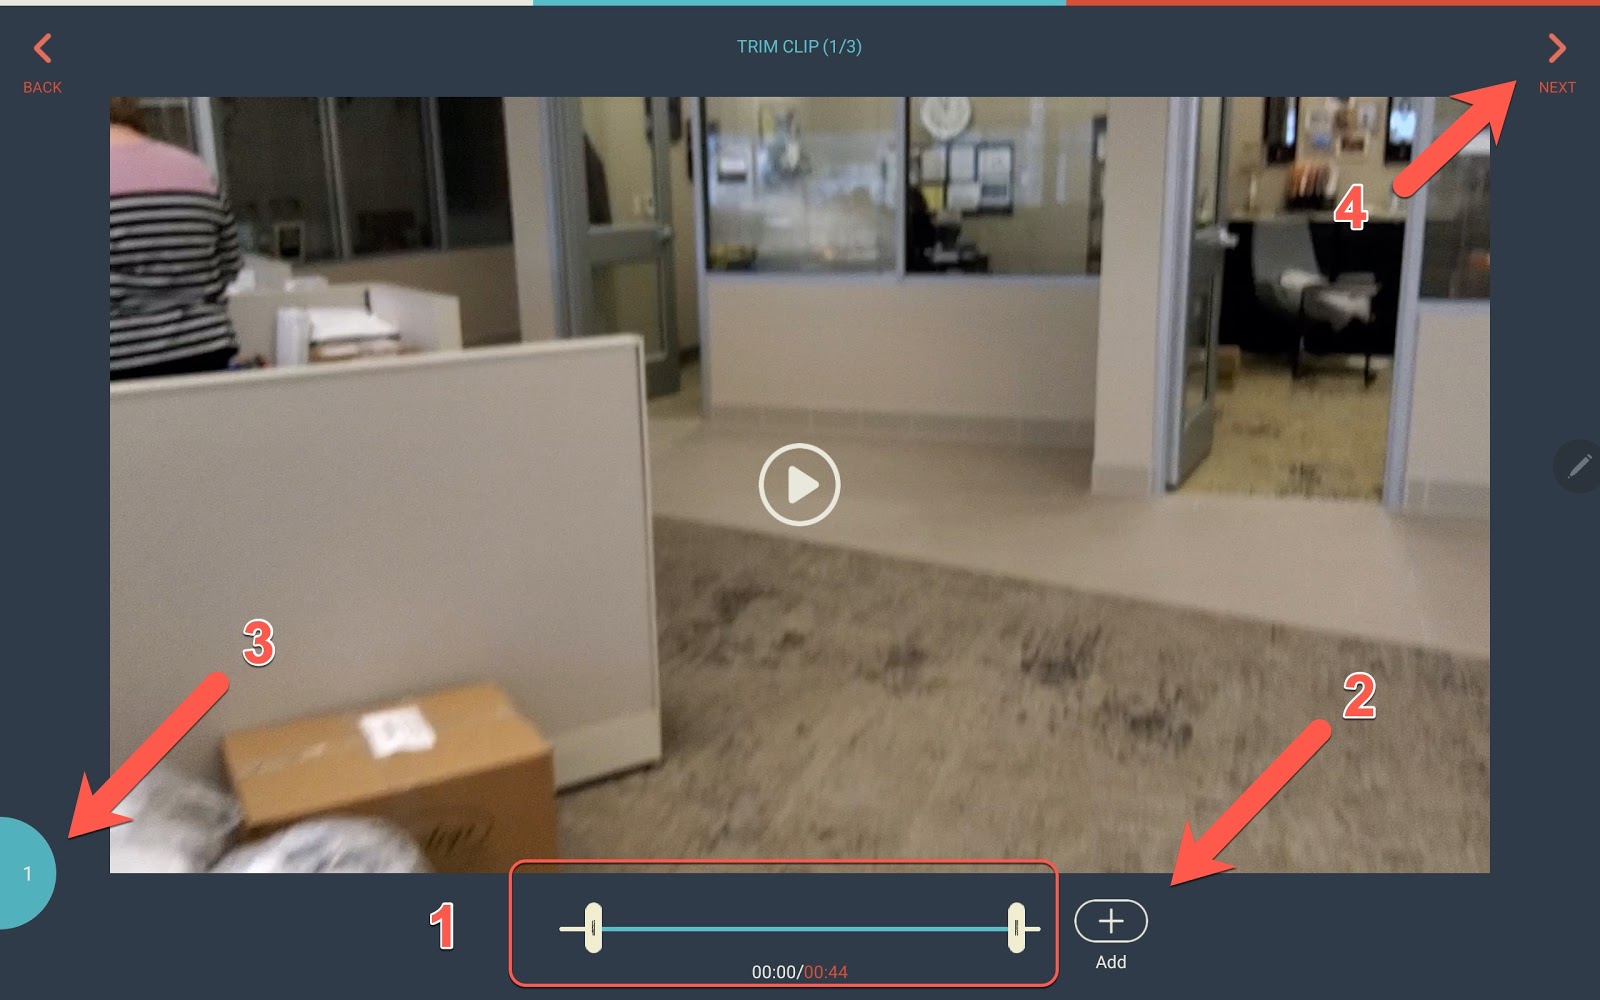
1. You can quickly trim your videos before adding them to your project.
2. Click Add to put this into your project.
3. You can see how many clips you currently have in your project. To add more, click Back in the upper left.
3. When you are ready, click Next.

Click on one of your clips to open the editing tools.

1. Click Trim to cut your videos files where needed.

If you need to add text to your clips, use Subtitles.
You can drag where you want the text to start and end.
Make sure the color of your text stands out against the changing background of your clip.

Voiceover is similar to subtitles, you can adjust where your voice starts.

If you have a long clip of you walking down a hallway, speed it up!

You can adjust certain elements of your clips, such as the brightness. It would be wise if you were super easy on these settings. Initially, it might look good but when you apply too many of these elements your video starts to look a little odd.

Click the old school save in the upper right when you are finished.

1. I would recommend always saving it to the camera roll first.
2. Next, upload to YouTube.
Note: If your video fails to upload, it is usually due to the fact you do not have a channel. Create a channel if your video does not upload.
Apple
WARNING!
- We would advise you to have a minimum of 1.5 gigs of free storage on your device before you start creating your project. Trust us, we learned the hard way. Use Google Photos to back all your images and videos to free up device space. It is also the easiest way to back up all your FACS videos.
- Do not delete any files off your device until the project has been uploaded YouTube and submitted for a final grade.
WARNING!
(iPad screenshots are coming soon, until then please refer to this post)
Comments
Post a Comment