
We were tasked with helping our PBL English classes learn a little about documentary films and how they are made. This post was used in class and then sent to the students as a reference.
In class, we watched this video to build a common understanding of how documentaries are put together and how they address the audience.
The first time we watched the film we split into teams of two. Our goal was to help identify the audience, who it might be created for. In our research, we found some documentaries are created to instruct, educate, help improve society, entertain and to uncover a hidden mystery. While this list could be huge, these were some of the most common themes.
The purpose was to help the students start to identify an audience for their own film and how to shoot clips that will help tell a compelling story.
Once we have established the audience, we broke up into the five focus groups listed below. We rewatched the video with each group just focusing on one element.
Focus Groups
Video Breakdown
Sound
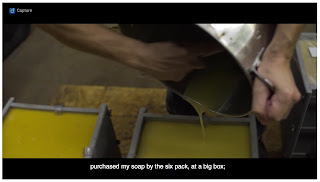
 While Sam works someone is giving a voiceover. You can see him work but you can't hear anything happening inside the shot. They also layered in some soft music to set the tone.
Lighting
 Always strive to use two lighting sources. It appears they have overhead lights and then another light source coming from the side to light Sam. The best light you can find is from the Sun.
B Roll

 While soap is an important part of the video, it is really all about Sam. Many of the B Roll shots are of Sam going about his daily life. The voiceover helps to add to the story while the images make it all come alive.
Background
 I am sure she has an office but shooting in the office would be boring. It is a soap company so why not sit in front of all the soaps? This makes the whole shot come alive and tell a deeper story.
Plan

Knowing that you are going to be shooting inside a soap company, then plan some of your shots to show them making actual soap. This is evidence they called ahead to find times they could come in and shoot soap creation.
Once we have established the audience, we broke up into the five focus groups listed below. We rewatched the video with each group just focusing on one element.
Focus Groups
- Sound - Whatever your subject is, it should be heard loud and clear. If there is too much-distracting background noise, or the subject is super quiet, the whole video becomes nearly unwatchable.
- Lighting - If you are in a basement, the overhead lighting tends to be too harsh. Dim the lights and add a second light source such as a lamp.
- B Roll - How does these video shots help tell the story without just being a talking head?
- Background - What is behind the subject? A blank is exceptionally boring, can you move them in front of a bookshelf?
- Plan - Sketch out your shots before you shoot, it will save you time and effort. This is the most important step of any video project.
Video Breakdown
Sound

Lighting

B Roll

Background

Plan


Knowing that you are going to be shooting inside a soap company, then plan some of your shots to show them making actual soap. This is evidence they called ahead to find times they could come in and shoot soap creation.
How to Edit
WARNING!
- We would advise you to have a minimum of 1.5 gigs of free storage on your device before you start creating your project. Trust us, we learned the hard way. Use Google Photos to back all your images and videos to free up device space. It is also the easiest way to back up all your FACS videos.
- Do not delete any files off your device until the project has been uploaded YouTube and submitted for a final grade.
WARNING!
This post shows you how to edit using the app Filmora. We picked this as it is free on Android and iOS.
Please refer to this post of general editing. What you see below are specific tips for making documentary films.
Voice Over and B Rolls
Apple/iOS


Music
Please note that Fair Use are loose guidelines and not a law. It is not wise to use copy-protected music in your videos as YouTube has a right to take them down. This post lists seven different places on the web you can go to get music you can freely use without penalty.
Lighting
 This triangle of lighting would be best, you can just use a lamp for the back/fill and a window for the key.
Please refer to this post of general editing. What you see below are specific tips for making documentary films.
Voice Over and B Rolls
Apple/iOS

Click Volume.
Decrease the overall volume to zero.

I would recommend knowing what you are going to say before you start recording. I usually bullet point my thoughts so what I am going to say flows. I even practice it three or four times before I record.

You need to hold the button the whole time you talk. If you let go, it will stop recording your voice.
Android

Start by clicking Audio Mixer.

Turn the video sound way down or all the way off.

Click record to start and pause to stop.
Music
Please note that Fair Use are loose guidelines and not a law. It is not wise to use copy-protected music in your videos as YouTube has a right to take them down. This post lists seven different places on the web you can go to get music you can freely use without penalty.
Lighting

Comments
Post a Comment