This post was created to help the Sappington 5th grade as they worked on their Genius Time projects.
Sites can be used for just about anything you want it to be. Some use it to teach fellow students about a topic while others have created sites as a summary of a book series they are reading.
One strong recommendation is to start your planning on a simple piece of paper and post-it notes before creating on a computer. We have seen many start creating on a laptop and soon get bogged down in too many disjointed pages.
Planning
I highly recommend starting your planning on paper. In my example, I am creating a Google Site to house all my photographs and videos. I can easily add a page by sticking on another post-it. I drew lines to show which page connects where.
If you are creating a site with someone else, paper helps both of you collectively plan before you build. Think, they are starting to build the new high school on paper first before they ever dig in the ground.
Pro Tip - show this paper to someone before you start building. Explain what each page will be used for to and ask if your ideas make sense. The feedback you get will help you create a more cohesive site.
Creating a Homepage
Start by visiting sites.google.com
Log in with your school Google account if prompted.
Click the plus symbol in the lower right corner.
1. Click to add a name to your page.
2. Click to add a title to the home page. This should be pretty generic and descriptive at the same time.
3. Click Text box to add a text box. Add a short description to tell the viewer what your page is all about. I always recommend to add some personality, there is no need to make this dry and boring.
Creating Pages
1. Click Pages on the right side of the screen.
2. Click the plus symbol near the bottom of the screen.
3. Name the page, then click done.
Your new pages will show up on the far right side of the screen listed under the Pages tab.
Adding Content
1. Click the Pages tab and select the page you want to edit. Then click the Insert tab. Double click on Text to add a text box.
2. Add your text. To make the text larger, select Title on the dropdown menu.
3. Click the artist's pallet to change the background color.
Photos
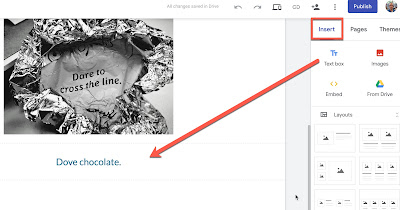
To add images, use the right-side navigation.
1. Make sure you are on the Insert tab. Click Images.
2. Click Upload if the image is on your device. Click Select if the image is found in Drive.
Don't forget to add text to your shots.
Video
To add a video you first need to make sure it is in your Drive.
1. Click Insert on the right side of the screen.
2. Click From Drive.
Scroll through your Drive to find the video you want to add.
Double click to add the video to your page.
The video will now appear. You can adjust the size and then add text.
Publishing
Click Publish in the upper right.
Click Manage.
Click Change for the section labeled Publish - Anyone at Lindbergh Schools can find and view.
Select Anyone can find and view the published version.
To see the site, click the downward-facing arrow and then select View published site.
Advertising
What is your plan for helping people find your site?
Right now the site I just created has a very long url - https://sites.google.com/lindberghschools.ws/colinsphotography/
This is too long to ask anyone to remember it.
It is a very good idea to shorten the address to make it easier for people to remember and type.
Start by visiting shorturl.
Paste the address in the box and then click the blue button.
The site will then shorten the super long address into something much, much smaller.


My name is Mrs.Aisha Mohamed, am a Citizen Of Qatar.Have you been looking for a loan?Do you need an urgent personal loan or business loan?contact Dr James Eric Finance Home he help me with a loan of $42,000 some days ago after been scammed of $2,800 from a woman claiming to been a loan lender but i thank God today that i got my loan worth $42,000.Feel free to contact the company for a genuine financial service. Email:(financialserviceoffer876@gmail.com) call/whats-App Contact Number +918929509036
ReplyDelete