This post was created to help guide our Seesaw session.
Seesaw is a student-driven online portfolio which can also be used for parent communication. All elementary buildings will be using Seesaw for Schools during the 2018-2019 school year.
Current Seesaw Users
Having you been using Seesaw in your classroom already and feel you want to advance your skills? Please scroll down to the Next Steps section. Each topic will be in purple to make it easier to find.
In the Next Steps you will find:
- Activities
- Seesaw Skills
- Seesaw Families
- Item Editing
- PD in PJs
- Seesaw Help
Getting Started
New Seesaw User
Immersion Experience
You will be experiencing Seesaw through the eyes of a student. Seesaw is many things and we have found the fastest way to help you understand is to have you use it as a student.
Your task:
- Download the Seesaw app on your mobile device (iOS or Android) or visit Seesaw on your laptop.
- Enter Seesaw as a Student.
- Enter the class code. This code will be displayed on the board during our session
- Read the article.
- Open the Seesaw app and complete the following steps.
Click the big green plus symbol in the upper right.
Click Photo to take a picture of any page of the article.
Tap the record button.
Record your voice summarizing the article in thirty seconds or less.
Tap the green check in the upper right when you are ready to upload it.
Select your name.
Click the green check.
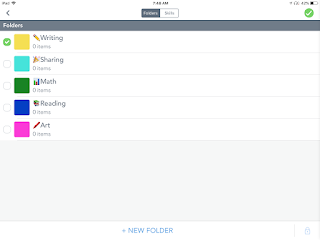
On the next screen choose the Reading folder.
Big Idea
- A student can use Seesaw to capture authentic classroom artifacts.
- Adding their own voice will allow you to understand what they are thinking in a new way.
Setting Up Seesaw
Getting Started Guides
Seesaw created specific guides for each grade level. It would be a good idea to read the one for the grade you teach. The Teacher Checklist is worth taking some time to work the steps. Following their outline will make sure you have everything ready for the first day. One of the most important steps is the one that talks about teaching your students about Seesaw. Many will have some experience but it is important to show them your expectations.
Activities
These are premade tasks for your students to accomplish.
Activities Experience
Layer 1
Open the Seesaw class we are using today.
Click Activities on the far right.
Complete and upload.
Layer 2
Logout and log back in as a teacher.
Explore the Activites already created for your grade.
You can edit the activities to make them better fit your curriculum and class.
Layer 3
Create your own activity from scratch.
Make sure you are logged in as a teacher.
Open the Activities section of Seesaw.
Click Create New in the upper right corner.
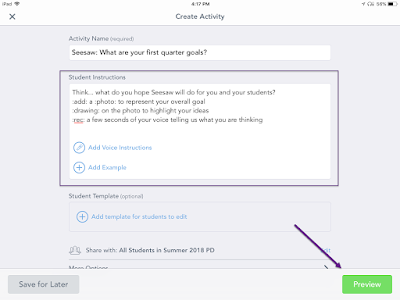
It is recommended to sketch your ideas out before you start writing in the Student Instruction section. Whatever is written here will be read and interpreted by the students without any further input from you. Adding your voice to walk them through is generally a good instructional practice to follow.
Click the big green Preview button when you are ready to go.
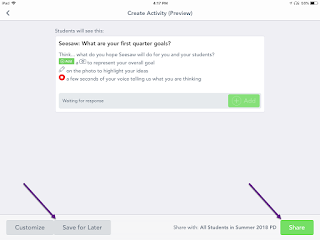
Click Share if you are ready for it to be immedatly pushed to your students.
Not ready? Click Save for Later.
We watched this webinar to learn more about what Activities are and could mean for teachers.
Adding those little icons in the activity description is easy. Check out this doc Seesaw created to show you how to create these helpful icons.
Seesaw Skills
Skills are a way to add some formative assessment layers into what your students are uploading to their journal. This might be a way to better track when collecting data for an SLO.
A short overview on what skills are and how to add them.
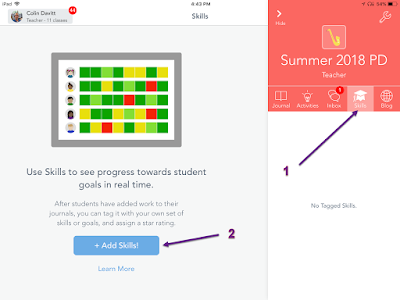
To access the skills you need to be logged in as a teacher.
1. Click Skills on the far right.
2. Click + Add Skills! to begin.

Click + New Skill near the bottom of the screen.
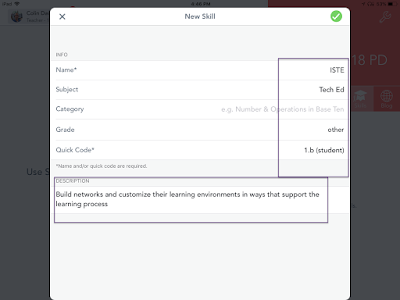
Everything with a little star (*) must be filled out.
It is wicked important to add a description. What makes a lot of sense in September might be a little lost on you when you pull it up in November. Adding a short description will save you a lot of time in the long run.
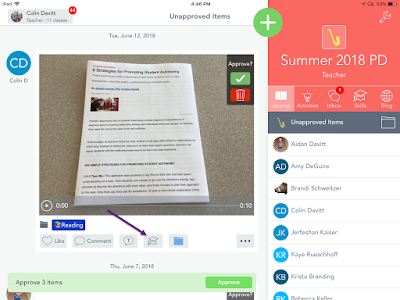
If this item is something I want to assess using my newly created skill, I click the graduation hat to get started.

I only have one skill in my account right now.
I click to apply it.

You will have the opportunity to add stars.
It is important to know what three stars mean before you start clicking.
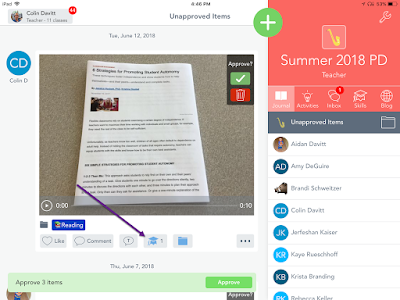
You can now see a little number on the graduation hat indicating how many skills were assessed. The number does not mean how many stars were assigned.
Seesaw Families
Check out this short study on the impact Seesaw has on students and community. While it was just based off a building administrators point of view, check out figure 2. What could this mean for you and your classroom?
A short article on how some elementary schools are using Seesaw. The first paragraph hooked me and had me dreaming of the possibilities. I never thought about using it as a teacher for a struggling student, this is a super idea. Recording something on the board and pushing that to parents, genius!
How might you get your parents to start engaging with their child in Seesaw?
Seesaw Families - This help center page might be helpful for you. I would encourage you to share it with your parents, some of this will help them learn how to engage their child in Seesaw.
Item Editing
What if you had some type of paper that you wanted the kids to fill out and turn in, how do you do that with Seesaw? (I know... some of you reading this will start saying this is a poor use of the tool. I am not suggesting this is something you do all the time but there might be a place for this somewhere.)
TEACHER PART
In your Seesaw class, click the wrench icon in the upper right.
Scroll down, turn on Enable item editing.
Start by logging in to Seesaw with your teacher account.
Click the big green plus in the upper right.
Click Post to Student Journal.
Add a drawing, something from your camera roll or add a photo.
I took a picture of my Post-It note and then clicked the green check in the upper right.
DO NOT ASSIGN TO ANYONE!
Just click the green check.
I did click the writing folder to keep it slightly organized.
Click the green check to move on.
STUDENT PART
The student logs in.
They see the item you want them to annotate.
They click on the three dots on the bottom of the image.
Have them click on Copy and Edit.
On the next screen, they will need to click their name.
Aidan clicks on the draw tool.
He filled in the Post-It.
Once he was satisfied, he hit the green check in the upper right.
The item shows up in the Journal stream ready for the teacher to take a look at.
PD in Your PJs
Check out how quickly you can narrow down what you are looking for on their PD in Your PJs page. Find your grade range and click, each has a series of videos to watch. We have used this to help spark new ideas on how to use Seesaw across the grades.
Seesaw Help
I think this is the best-organized help page I have ever seen. Click the topics or use the search bar located near the top of the page.
Want to lead some PD on Seesaw? They have a fun scavenger hunt to try out.
Seesaw




Comments
Post a Comment