
This post was used to support one of our summer session.
Gmail is one of those necessary apps that sometimes consumes hours of our work week. In this post, you will find a summary of top tips to help you maximize your Gmail experience.
Stay tuned for more Gmail tips in the near future.
There are two required things every district Gmail user must have up to date, signature and profile picture. These are super easy to do if you follow the directions on this post.
Tip 1: Tabs
Configuring your inbox will help you keep your primary tab clean and focused. The idea is to have Gmail automatically sort your inbox under certain categories.
The tabs are premade by Google, you can't rename them.

Configure your inbox.
1. Click the gear icon in the upper right corner.
2. Click Configure inbox. Enable the tabs you want to appear. I recommend choosing them all.
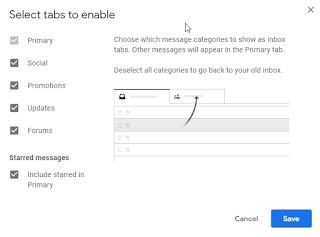
If you hover over each category it shows you examples of your actual emails that will be recategorized if you click the blue Save button.

If you hover over each category it shows you examples of your actual emails that will be recategorized if you click the blue Save button.

This example is from the Promotions tab. If something is miscategorized, just drag it to where you think it belongs. You classify things however you see fit. This simple tip has saved me countless minutes per day. Once I reclassify this email, every time EdSurge emails me it will appear in my Primary tab.
My classifications:
Primary - Emails I need to read and respond to.
Social - Everything from any social site that I get alerts from.
Promotions - Mostly things from vendors. I tend to ignore a lot of what shows up here.
Updates - This is filled with professional organizations, like ISTE, and tons of Seesaw alerts.
Forums - Any email from a building.
Tip 2: Conversation View
Have you ever emailed back and forth with someone? Maybe your team has an email strand that goes on and on? Gmail can automatically group those messages together to help give you context as to what everyone is talking about.

Everyone has responded to the original message allowing them to be grouped in a conversation view.

Start by open the settings in Gmail.

1. Toggle conversation view on.
2. Scroll to the bottom and click save.

An example of conversation view turned off.
All the messages are treated as individual messages.
This drives me crazy! All these related emails treated as individual messages.
This drives me crazy! All these related emails treated as individual messages.
Tip 3: Canned Response
Do you have to send the same email over and over again all week? You can create a template, called a canned response, to make sending these types of emails a snap.

Open a new email.
1. Compose the template. You want to keep it generic and open so you can fill in as you need.
2. Delete your signature.
3. Click the little ice cream cone (3 dots) in the lower right of the compose window.
4. Click Canned responses.
5. Click New canned response.

Name it and click OK.
Then close the email you just started to compose.

Open a new message.
1. Click the dots.
2. Click canned responses and look near the top.
2. Click canned responses and look near the top.
You should see the title of your canned message in the insert section.
3. Click to apply the response.

My canned response has all the fields I need to start filling in.
The big idea is that I send this email every week and it takes time. This template will help cut down on the time I need to compose this informative message.
Tip 4: Vacation Responder
You are going to be away from your classroom for whatever reason, why not set up an automatic email that will respond to everyone who emails you! Take a look at our post to learn how to enable this feature.
Note: This post shows the older version of Gmail. The steps are exactly the same for the new version.
Note: This post shows the older version of Gmail. The steps are exactly the same for the new version.
Tip 5: Time
We read post after post to learn how people who receive hundreds of emails a day deal with the flood of messages. One idea came up over and over again, limit your time in your inbox.
What we read was people designated just two or three times a day they check the inbox.
Example:
7:00 - 7:20 check inbox on mobile
12:00 - 12:20 check inbox on laptop
5:00 - 5:20 check inbox on laptop
This is how much time someone who gets hundreds of emails a day spends in the inbox. The following two tips will help you process those twenty-minute chunks.
Tip 6: Order
Spending only twenty minutes at a time in the inbox might seem impossible to some. The idea we found was that you can't jump from email to email, you need to start at the very bottom of your inbox and work up.
Once you hit the twenty-minute mark, log out!
This order will help prevent you from jumping from message to random message. If you have a process and stick with it, everything runs faster.
Tip 7: Process
We found those email ninjas have a tight process for dealing with what is in the inbox. They make a decision on every email they receive. If you stick to the steps below you can actually do tip 5 no problem.
1. Reply - Reply if you have time and it won't take more than a minute.
2. Delete - If they never ever might need the email again.
3. Archive - If the email needs to be saved or it will take a while to respond.
Archive
So you have an email you need to respond to but it will take too long to do so now, just archive it until later. To make sure you come back and actually answer it you need to use Google Tasks.

1. Copy the subject line of the email.
2. Click the tasks icon. Looks like a white and orange check mark.
3. Click the plus and paste the subject line.
When you have more time, open Tasks. Use the subject line you just saved to search your inbox for that message.

Click this symbol above the email message to archive the email.
Tip 8: Keyboard Shortcuts
We have read that using a mouse slows the user down especially when there are simple keys you can hit to get Gmail to do what you want.

Open Gmail's settings. See one of the tips above if you are unsure of how to do this.
Scroll down.
Click to turn the shortcuts on.
Scroll to the very bottom to save the changes.
Here are three shortcuts that will support what you learned in tip 7.
Open any email.
E - archive
R - reply to that message
F - forward the message to someone
# - delete the message
Learn more by visiting the Gmail shortcut help section.
Tip 9: Delete the Inbox
You have read about all these awesome ideas but feel they are not possible due to the number of emails in your inbox. No fear, just delete them all!
I personally selected all emails and moved them into a label. Out of sight but still searchable. I did this before I really started using the archive feature.


1. Click the checkbox to select all your emails.
2. Click this (liitle box with a doward facing arrow) to achive the messages.
3. Click the trash can to delete the selected messages.
Tip 10: Label
What we have read is that the email ninjas tend to not use labels as they can be inefficient and take time.
Think of a label as a post-it note you stick on the stack of papers. Whatever category is on the note applies to everything below it.
One word of warning, keep your labels limited and specifically generic. One example could be 18-19 parent communication or 2018-2019 PLC. Each is specific to a year and limited to one overarching topic. The hazards come in when you start adding a million labels to the system.

Click More labels on the far left side of your Gmail inbox.

Click Create new label.

You can create a new label or create a sub-label.

Open a new email message.
1. Click the little arrow looking icon at the top.
2. Pick a label to apply to the email.

Click on the label on the far left side. You can see all emails assigned to that label.

Click on the label on the far left side. You can see all emails assigned to that label.
Tip 11: Stars and Symbols
These are wicked fast visual cues to help you hone certain messages that demand your attention.

Open Gmail settings.
Scroll down to find the stars section.
Drop and drag the symbols you want to use to the In use: section.
Scroll to the bottom to save the changes.

Click on the star icon to the left of your email messages.
Keep clicking to cycle through the different symbols.
Use these as visual cues.
Use these as visual cues.
Tip 12: Search
Check out these tips to quickly find an email that gets lost in your inbox.

You can start typing in the Seach mail box at the top of Gmail or click the little arrow for more options.

Two of my favorite are searching for a date and filterings those with attachments.
Bonus
Inbox - a totally different way to interact with your email in an app or web. I really like how it bundles like emails into one group.
Inbox - a totally different way to interact with your email in an app or web. I really like how it bundles like emails into one group.
Comments
Post a Comment