The purpose of this post is to serve as a guide for our summer class Making Beautiful Art. If you did not attend, no worries! You can read the post and gain some new skills to help your punch up the images you take on your mobile device.
By the end of this course you will be able to:
- Use the Rule of Thirds when you take a picture.
- Edit images on your laptop.
- Edit images using a variety of apps on your mobile device.
- Download, install and set up Google Photos on your mobile device. (iOS/Android).
- Download and install PicMonkey (iOS/Android)
- Download and install Snapseed (iOS/Android)
Take a picture of that.
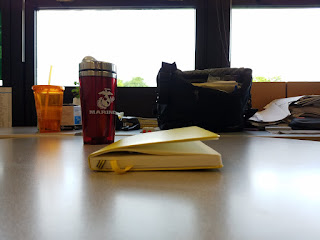
We started the session by taking a picture of a random table. The table was littered with assorted things just to make it a little interesting. The big idea is to start with a common object we all take a picture of. We will come back to the table and apply new skills to see how we develop throughout the session.
Evaluation of Award Winning Cell Phone Images
The class studied a series of images that were taken on mobile devices. The idea was to experience award winning images and try to under the techniques they used.
Rule of Thirds
After the video we talked a bit about the rule. Then we revisited the award winning images and applied the Rule of Thirds to it. The goal was to see how the rule could impact the viewers experience.
The Two Big Ideas
1. Use the Rule to direct attention.
2. Use the Rule to tell the viewer what the most important part of the image is.
Another idea that was not presented in the video was to zoom with your feet and knees. Many of us take images like they were shot from a helicopter. See the first image for an example, it was like I was hovering over the table when I took the shot. When you force yourself to move you start thinking of the image in a new way.
Retake Time
Before we took our second table image we turned on the grid lines in our camera app. This allowed us to see the Rule live on the screen.
Retake the shot of the table using the new ideas you just learned.
Compare the two, what do you notice?
Does one image tell a better story that the other?
Outside Photo Shoot
Remember to use the Rule of Thirds, tell a story with every shot and make every shot worth viewing. Keeping that in mind, complete the following task.
Go outside and shoot the following images:
- 2 close up shots of anything you find interesting
- 2 wide shots
- 2 medium shots
- 2 of anything you want
After shooting the images open up Google Photos on your laptop. Make sure the photos have synced so we can start editing.
Do you notice anything different about the shots you took?
Cropping - Google Photos
One of the fastest ways to improve most images is by cropping.
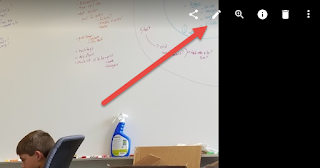
Open the image.
Click the pencil.
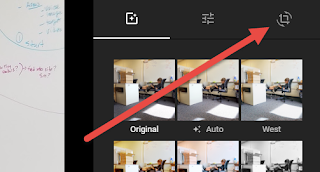
Click this icon.
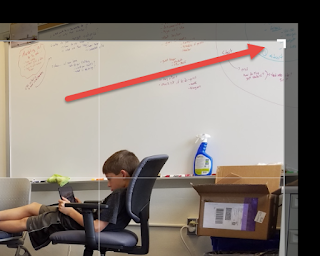
Grab one of the corners and start dragging.
Note the grid lines, keep in mind the Rule of Thirds.
Color Adjustment - Google Photos
Adjust the appearance of your image is wicked easy, just a click and a slide.

1. Click the middle icon.
2. Click the drop down arrow.

Select an option and slide.
Editing on Mobile - Google Photos
It is almost exactly the same as editing on your laptop.
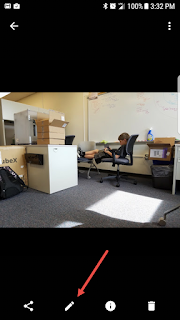
Once you open the image you want to edit you will notice the pencil at the bottom. Click that to find the editing tools.
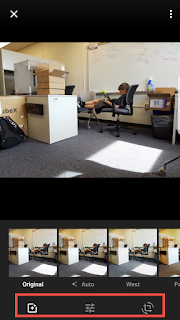
The tool options will appear at the bottom of your screen.
PicMonkey
A sweet app and site. Super easy to use for editing your images.
The idea here would be to start editing in PicMokey, save to camera roll and continue adjusting the image in Google Photos. This is a process commonly referred to as App Smashing. I'm positive many of you already do this with Seesaw.
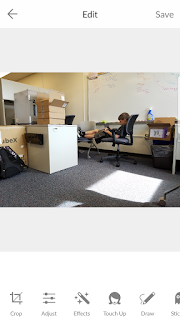
Similar to Google Photos, once you open the image you will find the editing tools at the bottom.
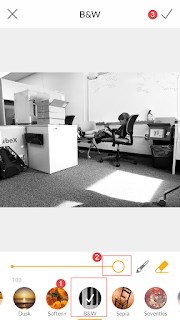
1. Find an effect
2. Adjust
3. Save
Then click Share. Choose Google photos.
Now you can continue to edit the image in Photos.
Snapseed
Snapseed is another Google product. While it is similar to Photos, it offers a few unique tools.
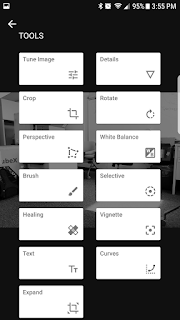
Open an image.
Click the pencil.
You will be presented with a number of options.
Check out the Text option.
Bonus
Want to see the most amazing option?
Take a selfie.
Open Snapseed and find your selfie.
Scroll down and find Pose.
Next Steps
In class we took some images. Edited them. Shared the results to a Slides so we could talk about what we did to create the art.
Support
Google Photos
Official Google help page.
PicMonkey
PicMonkey's twitter feed. This might be the best to follow for ideas and how-tos.
PicMonkey's support page - from photo editing, design collage and more.
Snapseed
Snapseed's Help Center
Bonus App
For some great B&W shots check out Lenka.


Comments
Post a Comment