IMAGE
In this post we will describe how to create a Crash Course style video using WeVideo. We will show you how to:
- create a storyboard
- setting up your surroundings
- controlling for sound
- adding different types of graphics to your video
- adding text
- layering in sound
- adding stock media
- publishing
What is a Crash Course video?
Example
Watch this video. What do you see and what do you notice?
Now, watch it again with these things in mind -
- What is the speaker doing throughout out the film? How does her voice sound?
- How did they use audio, music and sound effects, to help tell the story?
- How was B Roll used?
- What about text and popup images?
Storyboard+Setting Up+Editing
This is the trifecta for a successful Crash Course video.
Storyboard

Creating a cohesive video project can be somewhat difficult without a solid plan. Creating a plan is pretty simple if you create a storyboard. Google to find a storyboard or use the one linked here.
The key to a good storyboard is making it visual while adding a simple description to describe what is happening in the shot.
This simple tool will help all your ideas come together quickly enabling you to reduce the amount of time the assignment will take.
Setting Up for the Shoot
Think back to the video...
- What did the background look like?
- How well could you hear the speaker?
One of the biggest issues when creating a video is sound, if we can't hear you clearly then we quickly stop watching. Control your environment, make sure the surroundings are quiet and there is nothing overwhelming your voice. There are a ton of things that will produce sound on video that you normally don't hear.
Examples - fan, refrigerator, traffic noise, classroom and hallways are terrible for sound pollution
Editing
I am assuming you have all your footage shot at this point. It is recommended to load all footage to a Google Drive folder it make adding it to WeVideo faster.

Start by importing your video clips into WeVideo.
1. Click Uploads.
2. Choose Import.
3. Select the Google Drive logo, log into your school Google account. Choose the files and upload them to WeVideo.

I usually start by creating the intro.
To make it look professional, I click Videos on the far left. Once I find one that fits, I drag it to Video 1 track.
I repeat this audio, which is below the Video section, drag it to Audio 1.

The audio volume level should be adjusted to slowly fade out. Click the three dots to the right of Audio 1. Choose Audio & opacity, then Show audio level.

Click to add a dot, then fade out the music.

Adding text is similar to video and audio.
Click Text.
Choose what fits best and add it to the Text 1 timeline.
Double click what you just added to enter the editing screen.
Click Done.
Repeat this step to add credits at the end.

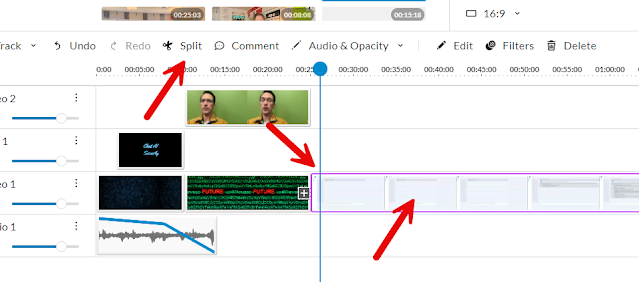
The audio clip is too long and needs to be trimmed.
Line up the playhead, the blue line with the circle top, and click Split.
Click the audio part on the right and delete it.

Drag the videos to the Video 1 track.
Trim the front and end of the clip if necessary.

Green Screen
Click + Track and add a video track.
Add your video to the newly added track.
On Video 1 track, add what you want to show up behind you.

Double click on your video.
Choose Keying.
Click the little eye dropper.
Click the green and see the magic.
Click Done in the upper right.
Green screen not working?
1. You do not have your video on the right video track.
2. Your green screen video isn't green enough. If the lighting is off, your video will not work correctly.

Start recoding your screen by clicking on the Upload tab on the left.
Then select Record near the top of the screen.
Then slect Screen or Screen & webcam based up what you want the video to look like.
I needed to edit the clip I just recorded, the beginning and the end of the clip detracted from what I was saying.
I clicked the clip to select it, as you see there is a pink line around it.
I then adjusted the playhead to where I wanted to trim it.
I used the Split tool to cut the track where the playhead is.
Finally I can select the tiny part of the track I just cut and delete it.

Adding a picture in picture helps tell your story while giving the viewer something to look at.

This time, put your video on Video 1 and the other on Video 2.

You now can click and drag the video/image.
Once you see the little corners, you can resize and move to where you need the clip to sit.

To add text, click Text on the far left.
Drag the text you want to the Text 1 timeline.
Double click the clip to open the editor. You can change the text and position.
Click Done in the upper right when finished.

To add B Roll, click Videos or Images on the far left.
Use the search to find something close to what you need.
Drag it to the timeline and edit as you see fit.

When you are finished, click Export in the upper right corner.

I would always save the file as Standard, don't save it as high def, that will take way too long to render.
Click Google Drive to save it there, it makes it much easier to turn in from Drive.
Click Export, then wait.
It can take 10-20 minutes for your video to finalize, once it is done then you can turn it in.
This post does a great job of showcasing how user-friendly platforms like WeVideo can simplify the video creation process, especially for educational content. As video continues to dominate online learning and digital communication, it's important to ensure that your content is optimized for different platforms and screen sizes. One often overlooked aspect of video editing is proper resizing. That’s why professional video resizing services are so valuable. Whether you're preparing content for YouTube, Instagram, or an e-learning platform, having the right dimensions and resolution ensures a better viewing experience and avoids quality loss. These services can save creators a lot of time and help maintain the professionalism of their videos across all devices. Thanks for the insightful guide—definitely a must-read for anyone getting started with video production or online education!
ReplyDelete