I am sure we have all participated in a number of Zoom webinars by now. You click the link and watch someone present about some topic. Zoom allows you to call in on a phone or use the speakers and mic on your laptop to participate.
The nice thing about a Zoom is you can have a conversation with your kids unlike using a screencast. This would be the perfect tool to use to host your class meetings when you are all remotely working from home.
This is not required! You are not required to use Zoom, we are posting this in the event you are interested in using it.
We will have additional posts about the other features of Zoom, but for now, this post will get you up and running. At the bottom, there is a how-to video. Note that you DO NOT need a headset or anything other than your school laptop to run the meeting.
Our next post will show you some options such as how to record and send out the video.
Getting Started


Zoom Help Center and Webinars
I would recommend looking at this page first, super easy to understand how to get started.
Zoom Help Center - this is pretty fantastic. Many topics to help understand how to use Zoom.
Zoom Webinars - some are live and some are recorded. Check out Zoom for Education, a prerecorded session.
The nice thing about a Zoom is you can have a conversation with your kids unlike using a screencast. This would be the perfect tool to use to host your class meetings when you are all remotely working from home.
This is not required! You are not required to use Zoom, we are posting this in the event you are interested in using it.
We will have additional posts about the other features of Zoom, but for now, this post will get you up and running. At the bottom, there is a how-to video. Note that you DO NOT need a headset or anything other than your school laptop to run the meeting.
Our next post will show you some options such as how to record and send out the video.
Getting Started

Log in at zoom.us
Click Sign In in the upper right.
Click the Sign in with Google button.
Use your Lindbergh Gmail account to log in.

Note: We have an upgraded account!

Click the blue Schedule a New Meeting button to get started.

You can set whatever you want but these are my recommendations.
Orange - I would recommend setting your meeting name, topic, to something that is logical. My Meeting is pretty nondescriptive. If you were teaching math maybe the topic could be Adding and Subtracting. I would give a short description, what will you be doing in the meeting? Showing me how to add? If that is what you are doing, then tell me!
Green - Set your date and time. Make sure your time zone is correct.
Yellow - I like to see who I am talking to, so I selected for the host, me, and the participant, you, to have video on. Trust me, your kids want to see you and I know deep down you really want to see their faces.

Keep scrolling down a bit to find these settings. If you are anticipating a lot of people, then mute upon entry. If you have a waiting room, then you have to accept them into the meeting, they won't automatically be in the room.

You are all set!
Copy the Join URL and get that to the kids. You could put the link in an email, Classroom or Canvas.
You can click Start this Meeting at any time to start it. You do not have to wait.

The first time you start there could be something you need to install. It will, or should, automatically download for you.
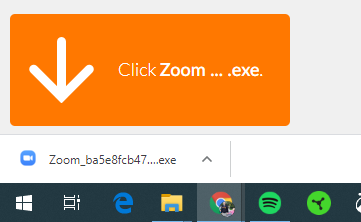
It should download and appear in the lower corner, click to install it.

Testing is your friend before you start the meeting click the Test Speaker and Mic before clicking the big blue button.
When you are ready, click the blue button to start.

If you have a waiting room, you will need to accept anyone who wants in.
Zoom Help Center and Webinars
I would recommend looking at this page first, super easy to understand how to get started.
Zoom Help Center - this is pretty fantastic. Many topics to help understand how to use Zoom.
Zoom Webinars - some are live and some are recorded. Check out Zoom for Education, a prerecorded session.
Comments
Post a Comment